Google Webmaster Tools – Part 1: Adding, Verifying, & Associating a Website with Google Analytics
If you are a website owner, and are not currently using Google Webmaster Tools, you are missing out on valuable data. In this post, I’m going to show you how to add, verify, and associate a website in Google Webmaster Tools with your Google Analytics account.
You will need a Google Analytics account to follow along. If you don’t already have one, you can create an account at www.google.com/analytics.
Step 1: Adding a website to GWT (Google Webmaster Tools)
First, we need to login to GWT: (use your Google Analytics account credentials): www.google.com/webmasters/tools
target=”_blank”>www.google.com/webmasters/tools
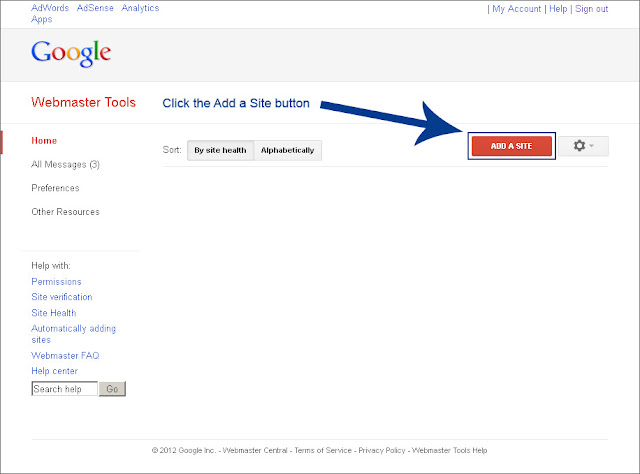
Once logged in, look for and click the “Add a Site” button.
 Type the URL of the website into the box and click Continue.
 Step 2: Verifying ownership of your website
After you click “Continue”, you will be required to verify that you are the actual owner of the website that you have just added. GWT provides us with a few options for verifying. I will show you how to verify using the “HTML file upload” method. If you don’t see that method under the “Recommended method” tab, click the “Alternate methods” tab.
Now select the radio button next to “HTML file upload”.
Download the html verification file, and then upload this file to the root directory of your website. Once you have done that, click the “Verify” button.
You now should have successfully added and verified your website in GWT. If your website fails to verify, go through the steps again, and make sure you uploaded the HTML verification file to the root of your website.
Step 3: Associate your Google Analytics and Google Webmaster Tools account
By associating GWT with GA (Google Analytics), you will be able to look at some of your GWT data in the GA interface, which makes viewing the data a bit easier on the eyes.
Go to your Google Analytics account and click the “Admin” button to enter the Administration section of Google Analytics. Note: If you track multiple websites with the same GA account, make sure you have the correct website selected from the dropdown menu in the top left of GA.
Once you are in the Administration section of GA, click the “Property Settings” tab.
Now click the “Edit” link.
You will be redirected to Google Webmaster Tools and you will see a list of the websites you have verified in your GWT account. Select the radio button for the website you want to associate, and click Save.
After clicking Save, you will be shown a confirmation message. Click OK. You will now be redirected back to Google Analytics. All that’s left to do is to click Apply.
You have now successfully associated Google Webmaster Tools with Google Analytics.
Next time, I’ll explain how you can use the data from Google Webmaster Tools to gain better insight about your pages’ visibility on Google!

 Type the URL of the website into the box and click Continue.
 Step 2: Verifying ownership of your website
 Download the html verification file, and then upload this file to the root directory of your website. Once you have done that, click the “Verify” button.
 You will be redirected to Google Webmaster Tools and you will see a list of the websites you have verified in your GWT account. Select the radio button for the website you want to associate, and click Save.
 You have now successfully associated Google Webmaster Tools with Google Analytics.